Welcome to Guriddo Autocomplete PHP
Introduction
Guriddo Autocomplete for PHP is a server-side component built on top of open and widely used standards.
Autocomplete, when added to an input field, enables users to quickly find and select from a pre-populated list of values as they type, leveraging searching and filtering.
By giving an Autocomplete field focus or entering something into it, the plugin starts searching for entries that match and displays a list of values to choose from. By entering more characters, the user can filter down the list to better matches.
This can be used to enter previous selected values, for example you could use Autocomplete for entering tags, to complete an address, you could enter a city name and get the zip code, or maybe enter email addresses from an address book.
You can pull data in from a local and/or a remote source: Local is good for small data sets (like an address book with 50 entries), remote is necessary for big data sets, like a database with hundreds or millions of entries to select from.
Features
- Blazing speed - only the minimal data required is sent from server to client using JSON.
- Supports the most popular SQL Databases like PostgreSQL, MySQL, Microsoft SQL Server.
- Supports array data.
- Client-side - familiar and powerful client-side API based on pure JavaScript.
- Feature complete - every feature you might need, including caching,loading data at once and etc
- Bootstrap 5 support - theming is based on widely used Bootstrap 5
- many more.
Requirements and Installation
Browser Support
Autocomplete for PHP supports all modern browsers:
- Edge
- Fire Fox
- Google Chrome
- Opera
PHP
As from version 7.0.0 Guriddo Autocomplete PHP is designed to work with PHP version >= 8.x
Databases
Currently we support the following databases
- MySQL versions 5 and up
- Microsoft SQL Server
- PostgreSQL versions 7 and up
- Oracle
- DB2
- Ibase/Firebird
- SQLite
- Mongodb
- ODBC
- Adodb (actually this is another php db layer)
MySQL, PostgreSQL and SQLite databases are supported througth PDO ,so depending on your PHP setup you may need to install it before using jqGrid for PHP. PDO is by default installed in PHP distributions.
To ensure that PDO is installed create a php file like this
<?php
phpinfo();
Save the file and run it on your web server.
By example the following should apper if you want to use MySQL
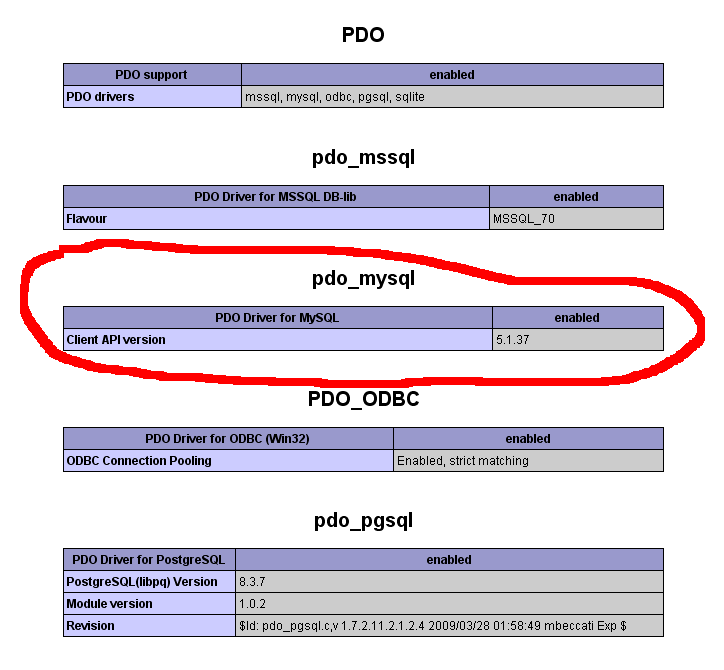
Check this for the driver you want to use.
Installation via composer.
Autocomplete class is part from the Giriddo Suito PHP/ Guriddo jqGrid PHP and in order to use it you will need to install the whole package.
- Unzip the archive in directory of your choice. After unzipping the directory will have the following content
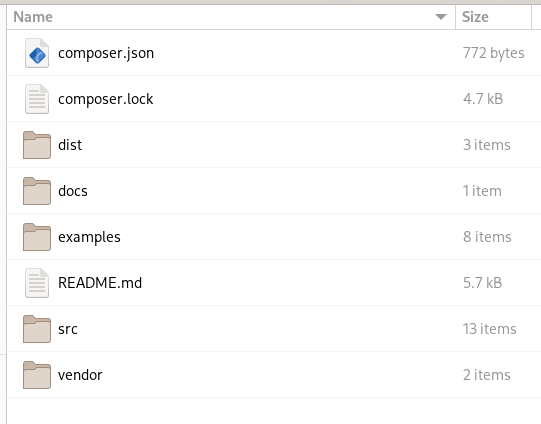
where:
dist directory contain javascript and css files + Visual Form builder code
docs directory contain documantation - both api and developers one
examples directory contain demo files
src directory contain all the Guriddo Suito classes
vendor directory contain autogenerated autoload file.
Attention
Currently there is no possibility to copy only certain directories when using the composer. It is recommended before to do anyting to move the following directories: dist, docs, examples and vendor to another place if you plan to use composer. Doing this go to the next step.
- In your project composer.json add the following item in repositories property
    "repositories": [
        ...
        {
            "type": "path",
            "url": "path_to/Guriddo"
            "options" : {
                "symlink" : false
            }
        }
        ...
    ]
    "require": {
        ...
        "guriddo/jqgridsuitophp": "^7.0.0"
        ...
    }
where the url should be adjusted to your needs. If you want to use symbolic link and not copy the files, change the symlink to true:
"options" : { "symlink" : true }
run the command
composer update
to update your autoload.php file.
In order to use Guriddo php lib in your project files point to your vendor/autoload.php file.
Installation without composer
Unzip the archive to directory of your project. This will create a directory Guriddo and other directories as described in the chapter above
In your project file do
require_once "path_to/Guriddo/vendor/autoload.php";
where path_to should be adjusted to your needs.
All the needed JavaScript and CSS files are placed in Guriddo/dist subdirectory, where in Guriddo/dist/css are the needed css files and in Guriddo/dist/js are the needed JavaScript files.
Of your choice, you can copy/move these files to other directory.
Installing packages for exporting
By default the installation comes without packages for the export (pdf and excel). These packages are placed into the suggest section of the composer.json file. In the directory of guriddo use the command to list these libs:
composer suggests --list
install these packges manually if you need the export to pdf and excel.
composer require tecnickcom/tcpdf
composer require phpoffice/phpspreadsheet
Quick start
After installing the php files it is necessary to know the location of javascript and css files which are located in dist subdirectory. This directory conatin two more subdirectories - js and css whith the needed CSS and JavaScript files.
The examples subdirectory contain mysql northwind database northwind.sql. Import this script in your mysql database and create the following index.php (or what you prefer name) file.
For Bootstrap 5 autocomplete it is needed to load the following files from the distribution again with bootstrap css file and bootstrap JavaScript file.
<!DOCTYPE html>
<html>
<!-- bootstrap 5 -->
<head>
...
<link href="https://cdn.jsdelivr.net/npm/bootstrap@5.2.0-beta1/dist/css/bootstrap.min.css" rel="stylesheet" integrity="sha384-0evHe/X+R7YkIZDRvuzKMRqM+OrBnVFBL6DOitfPri4tjfHxaWutUpFmBp4vmVor" crossorigin="anonymous">
<link rel="stylesheet" href="https://cdn.jsdelivr.net/npm/bootstrap-icons@1.8.0/font/bootstrap-icons.css">
<script src="https://cdn.jsdelivr.net/npm/bootstrap@5.2.0-beta1/dist/js/bootstrap.bundle.min.js" integrity="sha384-pprn3073KE6tl6bjs2QrFaJGz5/SUsLqktiwsUTF55Jfv3qYSDhgCecCxMW52nD2" crossorigin="anonymous"></script>

<!-- bootstrap autocomplete -->
<script type="module" src="../vendor/dist/js/ext/autocomplete.js"></script>
<!--
    Alternativley you cam use the following link
<script type="module" src="https://cdn.jsdelivr.net/gh/lekoala/bootstrap5-autocomplete@master/autocomplete.js"></script>
-->
</head>
<body>
......
<div class="row mb-3 g-3">
   <div class="col-md-4">
        <label for="company">Company: </label>
       <input id="company" />
   </div>
</div>

<?php include "firstautocomplete.php";?>
.......
</body>
</html>
Warning
Please note the type attribute of the script type=module. If this is not set the script will output error.
Save the file as autocomplete.php or any desired name in the root directory.
In the root directory you will find a file named jq-config.php. Open the file and enter the appropriate information for the connection to the database. Save the file and then create a file firstautocomplete.php with the following content.
<?php
ini_set("display_errors",1);
require_once '../../../jq-config.php';

use Guriddo\Utils\Utils;
// Connection to the server
$conn = new PDO(DB_DSN,DB_USER,DB_PASSWORD);
// Tell the db that we use utf-8
$conn->query("SET NAMES utf8");

$ac =  new \Guriddo\Autocomplete\bs5Autocomplete($conn);
$ac->SelectCommand = "SELECT CustomerID, CompanyName FROM customers WHERE CompanyName LIKE ? ORDER BY CompanyName";
// set the source from where to get data. In this case it is the same file.
$ac->setSource(Utils::fileUrl(__FILE__));
// Attach autocomplete to company id input
$ac->renderAutocomplete("company");
Run the file autocomplete.php from your web browser. All subsequent requests the autocomplete needs will be forwarded back to the "firstautocomplete.php" file and the component will automatically handle the requests and provide the needed response - no need for custom coding.
Connection and database drivers
If you take a look at our Quick start topic, you will see that Autocomplete for PHP does not create its own connection to the database, but uses a connection that already exists. This is a very flexible approach in complex applications where the connection to the database had already been created. Typically in our examples we create the connection using PDO rules, but this is not necessary and you can reuse your own connection.
The only what you need to know is which database you use and point the name in the constructor class as second parameter. Actually the constructor class has four parameters
function __construct($db=null, $driver='pdo', $logger=null, $odbctype='')
The $db is the database connection
The $driver - the database driver class that will be used
The $logger the logger instance
The $odbctype - the odbc type
Below is the list of available database drivers, which can be used as second parameter:
- adodb
- array
- db2
- ibase
- mongodb
- mysqli
- odbc
- oracle
- pdo
- sqlsrv
In case of odbc the forth parameter should be set to odbc and the fourth to the database. By example if a mysql odbc is used do
$grid = new new \Guriddo\Autocomplete\bs5Autocomplete($conn, 'mysql', $logger=null, 'odbc');
Using Logger
This feature is not available in current 7.0.0 release